Showing posts with label home made. Show all posts
Showing posts with label home made. Show all posts
Saturday, April 4, 2015
Quickie Tire Tumbler

Friday, November 28, 2014
Latest Beads
The diamond core bits on ebay are real cheap from china and some work well. I used them to punch these beads out and drilled the holes by eye, some you can tell, some not. The material is stuff I collected in Hachita. I then used pins in small pin vises to hold the bead against a vertical 6" diamond flat from Lopackis rotating at about 600 rpm to rough them in and homemade sanding wheels of the flap design to sand down to level where I could finish with diamond powders. See his bead tutorial at lopacki.com for information on how the bead works. The bottom pix is before polish at about 200 grit sanding level....b


Sunday, May 26, 2013
Making Saw Blade Shaft Adaptors
One thing everyone has had to come to grips with are saw blade adaptors, now that the majority of the diamond tooling we buy is made in China. There have been problems with consistency and other things, things like arbitrary shaft hole sizes in the same lot, et al. Sometimes, even most of the time, a Chinese item will work ok, as long as you fix it first. Remember that natural law, rocky-san.
When you put your new sawblade up to the shaft of your saw, and the hole in the blade is too big for the shaft, you are in need of a shaft adaptor. There are some commercial adaptors available and if you can find those that work (Good Luck!) stick with them. Otherwise, fashion your own from thin cut cross sections of pvc pipe, sanded and/or filed and/or cut down; or punched out of leather or plastic with round punches of varying sizes. That last I have been recently successful with. Tape your adaptor into the blades hole from one or both sides of the blade. Lighters can come in handy during these operations as well.
You want the blade to rotate without wobble, so it has to be centered on the shaft pretty closely. It can be done, perhaps not easily, but correctly. When doing these make 4-6, use the best one.
When you put your new sawblade up to the shaft of your saw, and the hole in the blade is too big for the shaft, you are in need of a shaft adaptor. There are some commercial adaptors available and if you can find those that work (Good Luck!) stick with them. Otherwise, fashion your own from thin cut cross sections of pvc pipe, sanded and/or filed and/or cut down; or punched out of leather or plastic with round punches of varying sizes. That last I have been recently successful with. Tape your adaptor into the blades hole from one or both sides of the blade. Lighters can come in handy during these operations as well.
You want the blade to rotate without wobble, so it has to be centered on the shaft pretty closely. It can be done, perhaps not easily, but correctly. When doing these make 4-6, use the best one.
Thursday, January 3, 2013
Your Guerilla Gem Shop
Gemstones have always been a viable currency. A million dollars in gold weighs quite a lot, it is cumbersome to carry....the right gemstones can be worth a million dollars and easily fit into a pocket.
Here are some things I have learned about working gemstones that will help anyone who likes to work with stone or is thinking about working with stone. You can get a lot more information from my book HOW TO BUILD BETTER LAPIDARY EQUIPMENT, but this is actually what I have evolved to on my bench, to do the lions share of my work, having gone through the entire smorgasbord of manufactured equipment and home made equipment, several times.
My specialty tumblers and grinders and saws, in HOW TO BUILD BETTER LAPIDARY EQUIPMENT are very viable machinery: they will be even more viable and useful, I am sure, as more people become aware and are educated in how to change stones into money.
Rule #1
I have found that most gem operations can be done on miniaturized equipment with diamond grinding burrs of various sorts, and small diamond blades.
To see the type of tooling I am speaking of, visit:
http://www.lopacki.com
I have gone from massive bench top machines to small motors on movable wood bases which are supremely flexible in their uses and attributes. You get much better at finish and creative work very quickly, employing the smaller bench lathe type machines detailed below, which can easily be built for 20$ or less.
Rule #2
Durability. Build your equipment to last. This is not hard to do at all. Pretty is not important. In fact, you may come to redefine pretty, as you gain respect and even awe through witnessing long term and flawless mechanical operation. Teslas motors still run as they always have, and they are a marvel for you to ponder as you use them.
Rule #3
Safety. A lot of safety is working wet and working outdoors. Your guerrilla shop will make it easy for you to be safe. By being mobile, you can employ the outdoors to your needs. Dust masks are good, but working wet is best, so that no powders ever become airborn. Rinse the work area regularly and well, so powders do not build up.
Your best water source for grinding operations up close is a simple spray bottle used by barbers and gardeners, housewives and window cleaners. Spray the wheels to keep them wet, refill the bottles when necessary. You can make shields for all your grinding operations from plastic milk jug or 2 liter bottoms, as explained below. They are a good idea in some situations.
Try to never work metal chain, wire, or rod on high speed or powerful motors. Thats how fingers and eyes are lost.
There are attachments that can be bought for most motor shafts, which convert a motor into a useful bench machine, like a grinder, or polishing unit, or what have you, with the turn of a couple of allen screws.
The attachment I speak of actually fits over the motors shaft, and is available from 1/4" to 3/4" sizes, to fit those size shafts, and even larger. Harbor Freight sometimes has these, or shop the Foredom company for a more high quality product. Once fastened to the motor shaft this attachment provides a threaded shaft for mounting a grinding wheel, or sanding drum, or flat lap disc.
There are some motor shaft attachments which are pointed and threaded to receive muslin wheels or other cloth polishing wheels.
Places like harbor freight call these motor shaft attachments: arbors. Other search terms: mandrels, chucks. I recommend Foredom motor shaft attachments whenever possible.
Be aware of right and left handed issues with these motor shaft attachments; will the shaft be facing right or left when mounted? The threading on the shaft will be different for different applications. They are sometimes labeled RH or LH. You want the wheel turning toward you, not away from you, for several reasons, the most important being safety, but also because if it rotates away from you, versus toward you, it will most likely loosen itself through use and be a real pain. If you keep your motors nice and portable you can always just turn it around on the bench top if it is turning the wrong way. Also, sometimes you can change the wiring at the motor and get a reverse spin to what you have, check the diagram on the motor if it has one.
The larger motors, like washing machine and dryers motors (1725 rpm 1/3 or 1/2 HP), can be dangerous and are actually overkill in most lapidary situations.
The best motor set up I have is a 1/20th hp motor with a 1/4" shaft, out of an IBM selectric typewriter. Attached to its shaft is a 1/4" mandrell/chuck. Into this chuck I can insert hundreds of different types of grinding bits and wheels. I can even make my own attachments with leather wheels, or silicon carbide cloth, and small diameter nuts and bolts. On this set up I can easily take a stone from rough shape to polish.
Stones can be rough shaped, prior to grinding, with diamond blades and larger grinders. They can also be flaked/knapped, and broken in other shearing ways, to good effect. Think tile snapping. Also nipping with pliers is effective to trim a rock without specialised equipment. Finally, shields for all wheels can be made from milk jug bottoms or 2-liter bottoms. Just cut the bottle as long as needed, then melt a hole in its bottom for the shaft of the motor to pass through before the wheel or whatver is attached to the motor shaft. Attach to bench or work table with a tack or small flat headed nail.

OK. Motors should always be considered portable. Once you have an attachment on the shaft of your portable motor, so that it can accept grinding and sanding wheels, or diamond grinding bits or whatever, then use quick clamps to fasten the motors where needed on the benches you use. Sometimes spacer wood will be necessary in this clamping operation, to get the wheel off the bench. You can mount motors to permanent spacers easily enough with hose clamps or other things, then just clamp the whole show to the bench. thats how I do it.
If you wish to make a motor semi-permanent in its application, and there are no readily available mounting features on the thing, you can wedge it at the bottom on two opposing sides, and use metal strapping with drywall screws to fasten it in place on a board, and there are other strapping configurations that work well too. Some motors have mounting features, but are out of synch with our particular needs. This is where the ability to fasten a motor in place using readily available materials is a good advantage to have.


I have many motors mounted in esoteric ways, most have been surprising in their longevity. Don't be skeered. Finally -- Never forget to look at old floor scrubbers and other equipment for sale at most thrift stores and flea markets. Some old floor scrubbers make excellent flat laps when reconfigured, and there are many other things that lend parts to educated entrepeneurship.
An important thing to know about motors is this: fans always prolong the life of electrical motors, when situated to dissipate heat. That means you should have the fan blowing on the electric motor in order to cool it, and it will run better for lots longer. Computer fans, I think they are also called biscuit fans, work very well and can be easily wired and configured to turn on when the motor is turned on. Also: when motors get old and carry a good load, sometimes they need to be hand started after the power is turned on, by spinning the pulley by hand. Don't get your fingers in the belt/pulley interface, you will be very sorry if you do.
If a motor hums but does not move, try hand starting, it usually works. Other motors require capacitors to get going, but sometimes they too can be hand started when their capacitors go kaput, and are bypassed.
Some trix at the guerrilla gem bench: Old abrasives can be reused for lesser but more refined operations. Collect the slurries and other detritus of abrasive actions, and retain. Can be sorted by washing, or dry sifting, too.
Glue stix are a true innovation. They can be used for many things, not least of which is easily dopping stones for working. This gives the operator something to hold onto. Melt the end of a stix with a lighter and apply to the bottom of stone, then after it cools, the glue stix itself can be used to hold the rock when grinding, which saves fingernails and skin. Wood dop sticks with dop wax are best, and small pieces of bamboo branches seem ready made for that operation.
Some very interesting pedal power machines are manifesting around, and pedal power is good. It is not too hard to do.
Diamond blades are going toward the miniature as well, and some can be bought less than an inch across! Many of these cut just fine when sprayed with water, or are otherwise lubricated. Some people make tile saws work for preforming rocks, and thats a good idea I think. Once the stone is down to grinding size though, a small bench-lathe will do all the rest of the work, all in one place, with a minimum of hassle, angst, and expense. Is that not nice?
Drilling stones definitely requires specialised equipment, and the 2 things that need to be remembered when drilling stone with a diamond bit is that slower is generally better, and the item being drilled with a diamond burr should be submerged in water, so that the drilling itself is also submerged. Clear the drilled hole often as you do it, which means: the deeper the hole goes, the more you should pull the bit up, actually exiting the hole, so that mud from the operation does not overheat the bit and cause the diamond plating to separate from the bit. Some neo-experimenters use bow drills and even galvanized pipes to drill holes larger than normal, or out of the ordinary, and I think anything a person can do to accomplish what they are able to conceive is a good thing, and the way its supposed to be. Keep an open open mind.
Large stone or glass drilling is done with an abrasive slurry that is steadily drip-fed to the point of contact between stone and a piece of heavier sized pipe. Very time consuming, but ways can be improvised to speed it up, if thought is given and time is taken. The native Americans had some novel drilling units, most notably a pump type drill that is easy to duplicate and is the most efficient non-electrical drill I have ever seen.
Hand Grinders should be employed whenever possible because they are good efficient tools for the stone sculptor. They are made from small motors modified by attaching a pistol grip, usually by means of a couple of hose clamps around the motor, and through a perforation on the pistol grip handle. Put a chuck on the motor shaft and you can easily utilize all the available diamond grinding bits and burrs to carve large sized sculptures. These also make good hand-sanding units. Cut discs of sandpaper 3-6" across and attach to a mandrel with a washer on either side of paper. This will flex if it has no backing to it, and thats fine because the flexing of the sandpaper disc will allow you better control at contours and in other hard to sand places.

About rocks. They must have good eye appeal, bright, colors, chatoyance, opalaescence, irridesence -- this is where pretty matters, pretty is all. It takes as long to make a strand of dull grey limestone beads as it does a strand of bright green serpentine beads. Always strive for bright colors, clear and clean material free of pits and undercutting, and the nicest polish you can get. If you have a stone people look at and go Wow, thats a good one. Remember though that the dust from some stones is poisonous or hazardous, and with the softer materials it is definitely something to guard against.
Bill Gallagher
Light Happens.
Wednesday, January 2, 2013
How To Make Flap Wheel Sanding Discs For Bench Lathe
The best way to make flap wheels for the bench
lathe: cut a circle out of sanding cloth, punch a hole in the
middle, put it on a mandrel with two washers, either side, and then make
four equal and equilateral cuts at four places on the outside of this
disc. Cuts are at 12 oclock, 3, 6, 9 oclock, and come in only about 1/4
" or so.

They deform spherically and uniform every time, make nice inexpensive and easily replacable sanding tools. I use 100, 220 grit belts mostly, I cut the worn ones up for this, or if I need real aggressive action I use new sanding cloth in those grits. 400 and 600 work too.
One must be forceful to get the propellor shape to manifest, and this should happen as the disc begins to wear some, so that you get max cutting power from the new cloth. Once the propellor shape happens you will get a true flap wheel effect and it will be harder to use the center of the disc. The tool will take a lot of hard wear before it wears out. It can be used inside hollows, and works well for that, just watch that metal from the tool does not hit the stone.

Increasing the number of cuts at the outside of the disc can create some interesting effects, and by making the cuts deeper at the edge of the disc you can actually get a flapwheel effect. Finally, if no cuts are made, the wheel wears and forms in certain predictable ways too, giving you a real nice spectrum of variability in your sanding work.

They deform spherically and uniform every time, make nice inexpensive and easily replacable sanding tools. I use 100, 220 grit belts mostly, I cut the worn ones up for this, or if I need real aggressive action I use new sanding cloth in those grits. 400 and 600 work too.
One must be forceful to get the propellor shape to manifest, and this should happen as the disc begins to wear some, so that you get max cutting power from the new cloth. Once the propellor shape happens you will get a true flap wheel effect and it will be harder to use the center of the disc. The tool will take a lot of hard wear before it wears out. It can be used inside hollows, and works well for that, just watch that metal from the tool does not hit the stone.
Increasing the number of cuts at the outside of the disc can create some interesting effects, and by making the cuts deeper at the edge of the disc you can actually get a flapwheel effect. Finally, if no cuts are made, the wheel wears and forms in certain predictable ways too, giving you a real nice spectrum of variability in your sanding work.
Monday, December 31, 2012
A Homemade Sandblaster From A Scrap Dishwasher
This photo presentation concerns the building of a homemade sandblast cabinet. The apparatus is constructed from an old dishwasher housing, which is just about the right size for a good sandblasting cabinet, and which also has a deep well bottom for holding the abrasive medium/sand. You will probably have to plug the bottom, after it is stripped.
The dishwasher housing is mounted on a wood base so that the arms are at a comfortable height above the ground.

The arm holes are cut in the side of the DW housing with a sawzall, or metal cutting jigsaw, and then fitted/lined with 4 inch pvc fittings. The rubber gloves for the inside of the sandblaster are hose clamped to the pvc on the inside. You may be able to salvage gloves with sleeves, and if not, start your search at a safety equipment supply. They should be heavy and entirely rubber coated.

The air is supplied to a spray gun via an air compressor of decent size. The bigger the better, actually. The spray gun has a subsidiary intake which is modified with an extension (flex Pipe/Hose) inserted into the sand reservoir at the bottom of the DW housing, through a hole in the work-surface screen.


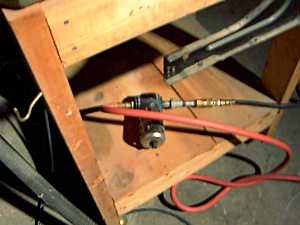

A light mounted in the housing is a necessity also. It should be across from the viewport, pointing toward where the work will be. An bare incandescent light bulb will also help to dry the area, which you cannot get enough of anyway, dryness I mean. Dessication and abrasive blasting go hand in hand. The viewport in this cabinet is a piece of plexiglass caulked over a penetration in the dishwasher housing at the edge of the housing just above the arm holes. It is about 4x8" on this rig, but I would have liked it bigger.
The unit is of course closed entirely during operation.
A drying filter in the compressed air line will make life a whole lot easier, and can probably even be used, in some instances, to vary air flow. Notice the intake at the bowl of abrasive is crimped, to limit uptake as well.

Friday, December 7, 2012


Friday, October 12, 2012
How To Build A Diamond Saw On The Fly


A picture essay of a saw I recently built to handle a 14" blade which I already owned. The blade is the hard part of this project, the bigger they are the higher the cost, and I needed something to cut with fast. I found the arbor somewhere, and it runs nice and true. This is my first real wood project, and Gunn Cues was right, vibration was nearly eliminated. This thing cut like a hoggy dog. I made the blade spacer/bushing for the shaft from a slice of pvc pipe that was then cut and adjusted to make a perfectly round run on the saw. That takes some practice but is critical and it can be done if the time is taken.
Subscribe to:
Posts (Atom)