email me: luxefaire @ gmail.com
Build A Charcoal Fueled Metal Casting Furnace

This project is easily accomplished by anyone with at least an average mechanical aptitude. The actions of the author are protrayal of tested knowledge. The actions of anyone else, whether aware of this knowledge in whole or in part, or not, are in No Way to be construed as actions of the author.

It is very simple to build a metal smelting furnace powered with regular store-bought charcoal briquets. Temperatures in excess of 2500 degrees fahrenheit can consistently be reached, and sometimes a good bit higher. The apparatus can be as simple as a coffee can buried partially in the ground, with a pipe and blow dryer for the air source, or as extravagant as a galvanized trash can utilizing firebrick, fireproof mortar (refractory mix), stainless steel, and a heavy duty air blower, as can be found on many high output electric and gas heaters or air conditioners.
Care must be taken to measure and understand the air input to your furnace though, because many times too little is ok, and will work, whereas too much air, too much pressure, will blow cinders out of the fire and even dampen the heat. I use a blow dryer on low, and can melt silver easily, with high settings used only at the end of a brass melt. Below are a few pictures of the furnace I am currently using. It is nice and portable, and I have melted 5 pounds of silver in one crucible load with this furnace.


The main thing one needs to be concerned about when melting metal (Or doing ANY shop work, for that matter) is SAFETY. Say it: Say---ffffff---TEE. Molten metal will go off like a bomb if mishandled, or if impurities are introduced into the crucible during a melt, and the shrapnel of course is molten and will burn through most things, you included, before you even know it is happening. Not cool at all. This I know from experience. Molten metal blowing up is one of the ugliest things I have ever witnessed.

Notice in these pictures of my furnace that there are two compartments, a lower, and an upper. The lower is nothing more than a large coffee can with top and bottom cut out. A piece of screen separates the top and bottom compartments, resting on the lower cans opening. The lower can has a hole in the side also, just big enough to allow the air pipe in, and it sits on some filler, clay. The top compartment is another coffee can, bottom down, with the bottom left intact, but punched full of larger sized (three quarter inch) holes, to allow the airflow good access to the fuel charge, the charcoal. Make a lot of holes, dont skimp. You want plenty of airflow through the two compartments.
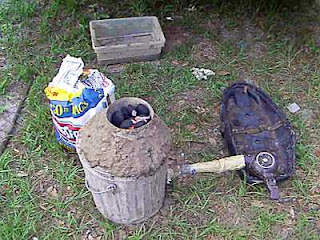
Firebrick and common clay from the ground is what I use to contain the heat, and hold the cans in place. I usually clean and refill around the cans each time I use the furnace. The pipe for the airflow goes into the bottom compartment, through the wall of the little galvanized trash can, and through the fire brick and coffee can. It enters the lower compartment at about the halfway point, and closer to the bottom is better. The lower compartment allows a bit of pressure to be built up, to jet up through the top compartment, where the fuel and crucible live. The charcoal goes in the top can, and you need to light the charcoal first, using a propane torch, or lighter fluid. If you use lighter fluid use just a small amount and let it soak in for a full 120 seconds before lighting. Once lit, and once some of the briquets get ashed over a little, like at the corners, turn on your air supply and away she goes.
After turning on the air supply, put the loaded crucible on the coals once they are totally ashed over, and continue to feed the fire with charcoal until your metal puddles. You have to feed the fire by placing briquets around the edges of the crucible with tongs. Let the crucible fall a little into the upper compartment, after the fire gets going good, so that hot coals surround it. The crucible will get red hot quickly. I use either a fused silica crucible or a graphite. You can gently shake, or tap the crucible occasionally, agitating the metal, which may induce melting. I use kingsford charcoal and it is by far the best for this purpose. I also use powdered charcoal as a flux, and there are many other things that work as flux too, like borax and the like. Powdered charcoal is free, and can be collected from the bottom of the bag you buy. It covers the metal and keeps it from oxidizing as it heats. You can be liberal with it, like a few tablespoons per load of metal, if you are using a five pound crucible.

If the metal is having trouble melting, sometimes addition of a little flux will remedy the problem. The Complete Metal Smith by Tim McCreight is a great book to have around whenever working with metal.
A swirling motion on the surface of the molten metal usually
means it is ready to pour. Never look directly over a crucible. Wear
gloves, a hat, safety glasses, leather shoes and a long sleeved shirt
when smelting metals. I use crucible tongs which are just a long set of
plier-like things I got at a flea market. I grab the lip of the
crucible firmly, then quickly and smoothly move the crucible to my mold
and pour in one fluid motion
I use my metal casting furnace in conjunction with the delft casting method, a unique and extremely easy to use molding system that will produce highly detailed and consistent parts with little or no fuss. Search for Swest Jewelers supply, Indian Jewelers Supply, or Rio Grande Jewelers Supply online, they all carry the kit. It is around 100 bux, and comes complete with a video, casting sand, and a small mold. Once you see the system you can make bigger molds easily, and it is well worth your time to get into this if you have a need to reproduce small to medium sized parts from original models of high detail and uniformity.
As in any sandcasting, undercut models are not feasible, but many many other things can be reproduced easily and efficiently with sand casting. There are cheaper sands, and different mold set ups and if you are after a lesser uniformity, or the pieces do not require great detail, then other types of sandcasting should be looked into by you too.


Build A Charcoal Fueled Metal Casting Furnace
This project is easily accomplished by anyone with at least an average mechanical aptitude. The actions of the author are protrayal of tested knowledge. The actions of anyone else, whether aware of this knowledge in whole or in part, or not, are in No Way to be construed as actions of the author.
It is very simple to build a metal smelting furnace powered with regular store-bought charcoal briquets. Temperatures in excess of 2500 degrees fahrenheit can consistently be reached, and sometimes a good bit higher. The apparatus can be as simple as a coffee can buried partially in the ground, with a pipe and blow dryer for the air source, or as extravagant as a galvanized trash can utilizing firebrick, fireproof mortar (refractory mix), stainless steel, and a heavy duty air blower, as can be found on many high output electric and gas heaters or air conditioners.
Care must be taken to measure and understand the air input to your furnace though, because many times too little is ok, and will work, whereas too much air, too much pressure, will blow cinders out of the fire and even dampen the heat. I use a blow dryer on low, and can melt silver easily, with high settings used only at the end of a brass melt. Below are a few pictures of the furnace I am currently using. It is nice and portable, and I have melted 5 pounds of silver in one crucible load with this furnace.


The main thing one needs to be concerned about when melting metal (Or doing ANY shop work, for that matter) is SAFETY. Say it: Say---ffffff---TEE. Molten metal will go off like a bomb if mishandled, or if impurities are introduced into the crucible during a melt, and the shrapnel of course is molten and will burn through most things, you included, before you even know it is happening. Not cool at all. This I know from experience. Molten metal blowing up is one of the ugliest things I have ever witnessed.

Notice in these pictures of my furnace that there are two compartments, a lower, and an upper. The lower is nothing more than a large coffee can with top and bottom cut out. A piece of screen separates the top and bottom compartments, resting on the lower cans opening. The lower can has a hole in the side also, just big enough to allow the air pipe in, and it sits on some filler, clay. The top compartment is another coffee can, bottom down, with the bottom left intact, but punched full of larger sized (three quarter inch) holes, to allow the airflow good access to the fuel charge, the charcoal. Make a lot of holes, dont skimp. You want plenty of airflow through the two compartments.

Firebrick and common clay from the ground is what I use to contain the heat, and hold the cans in place. I usually clean and refill around the cans each time I use the furnace. The pipe for the airflow goes into the bottom compartment, through the wall of the little galvanized trash can, and through the fire brick and coffee can. It enters the lower compartment at about the halfway point, and closer to the bottom is better. The lower compartment allows a bit of pressure to be built up, to jet up through the top compartment, where the fuel and crucible live. The charcoal goes in the top can, and you need to light the charcoal first, using a propane torch, or lighter fluid. If you use lighter fluid use just a small amount and let it soak in for a full 120 seconds before lighting. Once lit, and once some of the briquets get ashed over a little, like at the corners, turn on your air supply and away she goes.
After turning on the air supply, put the loaded crucible on the coals once they are totally ashed over, and continue to feed the fire with charcoal until your metal puddles. You have to feed the fire by placing briquets around the edges of the crucible with tongs. Let the crucible fall a little into the upper compartment, after the fire gets going good, so that hot coals surround it. The crucible will get red hot quickly. I use either a fused silica crucible or a graphite. You can gently shake, or tap the crucible occasionally, agitating the metal, which may induce melting. I use kingsford charcoal and it is by far the best for this purpose. I also use powdered charcoal as a flux, and there are many other things that work as flux too, like borax and the like. Powdered charcoal is free, and can be collected from the bottom of the bag you buy. It covers the metal and keeps it from oxidizing as it heats. You can be liberal with it, like a few tablespoons per load of metal, if you are using a five pound crucible.
If the metal is having trouble melting, sometimes addition of a little flux will remedy the problem. The Complete Metal Smith by Tim McCreight is a great book to have around whenever working with metal.
I use my metal casting furnace in conjunction with the delft casting method, a unique and extremely easy to use molding system that will produce highly detailed and consistent parts with little or no fuss. Search for Swest Jewelers supply, Indian Jewelers Supply, or Rio Grande Jewelers Supply online, they all carry the kit. It is around 100 bux, and comes complete with a video, casting sand, and a small mold. Once you see the system you can make bigger molds easily, and it is well worth your time to get into this if you have a need to reproduce small to medium sized parts from original models of high detail and uniformity.
As in any sandcasting, undercut models are not feasible, but many many other things can be reproduced easily and efficiently with sand casting. There are cheaper sands, and different mold set ups and if you are after a lesser uniformity, or the pieces do not require great detail, then other types of sandcasting should be looked into by you too.