Monday, December 31, 2012

A Homemade Sandblaster From A Scrap Dishwasher


This photo presentation concerns the building of a homemade sandblast cabinet.  The apparatus is constructed from an old dishwasher housing, which is just about the right size for a good sandblasting cabinet, and which also has a deep well bottom for holding the abrasive medium/sand.   You will probably have to plug the bottom, after it is stripped.   The dishwasher housing is mounted on a wood base so that the arms are at a comfortable height above the ground.

The arm holes are cut in the side of the DW housing with a sawzall, or metal cutting jigsaw, and then fitted/lined with 4 inch pvc fittings.  The rubber gloves for the inside of the sandblaster are hose clamped to the pvc on the inside.  You may be able to salvage gloves with sleeves, and if not, start your search at a safety equipment supply.  They should be heavy and entirely rubber coated.


The air is supplied to a spray gun via an air compressor of decent size.  The bigger the better, actually. The spray gun has a subsidiary intake which is modified with an extension (flex Pipe/Hose) inserted into the sand reservoir at the bottom of the DW housing, through a hole in the work-surface screen.


As compressed air from the compressor is jetted out of the gun, it draws the sand through the intake embedded in the sand pile at the bottom of the housing, to be jetted out alongwith the compressed air.  It has good sandblasting force.  Different sands will do different things, too.  The sand, and some of the blasted detritus, will both find their way back to the bottom of the the DW housing, so it is a good idea to clean the sand, or change it occasionally.  Also, a small diameter screen across the intake will keep the nozzle of the gun from clogging too often.  A shopvac hose is inserted in another penetration made at the top of the DW housing, to be used during sandblasting for dust removal.


A light mounted in the housing is a necessity also.  It should be across from the viewport, pointing toward where the work will be.  An bare incandescent light bulb will also help to dry the area, which you cannot get enough of anyway, dryness I mean.  Dessication and abrasive blasting go hand in hand.  The viewport in this cabinet is a piece of plexiglass caulked over a penetration in the dishwasher housing at the edge of the housing just above the arm holes.  It is about 4x8" on this rig, but I would have liked it bigger.

  The unit is of course closed entirely during operation.  
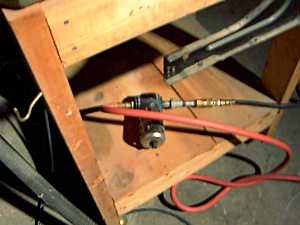
A drying filter in the compressed air line will make life a whole lot easier, and can probably even be used, in some instances, to vary air flow.  Notice the intake at the bowl of abrasive is crimped, to limit uptake as well.


Saturday, November 10, 2012

Polishing Pad

One of the things covered lightly in the book but could use more attention is how to obtain good polishing pad, for use on the flat lap with slurrys and powders.  I know people who use silica powder as polish and apply it with carpeting, both shag, and of the indoor outdoor variety.  I have used their equipment and it works, but slings more than is necessary because the silica is cheap cheap stuff and the mechanics are not worried about it.  When using expensive abrasives like cerium oxide, it is best to keep from slinging anything, although that can only be achieved in degrees, never perfectly.

I like some of the new fabrics and most can be found in cloth stores or hobby stores that cater to sewing.  I have tried several different types of thicker wooly cloths at these places and like them, also marine upholstery, if heavy enough, works wells sometimes, if its the right type.  Experimentation with different types of materials, especially salvaged stuff, is encouraged.

I found the best polishing pad for my purposes to be school bus seat upholstery, fire retardant, with a good rubber/plastic exterior, that is the down side of the pad, where it gets glued to the lap plate, and a real durable fluffy padding on the inside, which is what you polish on.  It can be obtained as salvage at junkyards.

I am soon to be experimenting with floor liner out of a newer car, it is a somewhat woven and pressed 1/4" thick pad which may or may not be good for polishing, I will report it.  This is the pad that goes between the carpet and the floor of a car or suv.  It looks like it might be better than most things.

***** IT WAS NOT.  It tore up quickly, disintegrating almost as fast as the earlier polishing pads they used to sell mje at the rock shops, no longevity whatsoever.  Back to the drawing board, my best stuff yet is fireproof upholstery out of school bus seats.

The bottom line is the polishing pad is necessity, and it wears out, it must be replenished.  If you find a material that works for you, and you are doing a lot of work, or anticipate doing a lot of work, get a good supply if you can.


Friday, October 12, 2012

My Vibrating Tumbler

It will be hard for anyone to build one of these and make it work without the books chapter, but this will show the buyers of the book a larger sized quickie version of the tumbler I developed for my book and work.  It is a monster, and works well, and can easily be constructed anywhere.  A 50 pound capacity vibrating tumbler is worth a few thousand dollars at least if you buy it new, so one can begin to realize the savings when building your own equipment.  as with any equipment, one must constantly monitor production and quality, adjusting the machinery to wear of many types, and variance in loads.  If one sticks with it for just a few hours, one may gain an advantage extraordinaire.  The smaller version of this tumbler, as explained in the book, is good for a few pounds of rock, but the size of the machine is limited only by your resources at hand.  Most of this is made from salvaged parts, if not all of it.


Some Work I Have Accomplished With My Home Made Equipment


How To Build A Diamond Saw On The Fly


A picture essay of a saw I recently built to handle a 14" blade which I already owned.  The blade is the hard part of this project, the bigger they are the higher the cost, and I needed something to cut with fast.  I found the arbor somewhere, and it runs nice and true. This is my first real wood project, and Gunn Cues was right, vibration was nearly eliminated.  This thing cut like a hoggy dog.  I made the blade spacer/bushing  for the shaft from a slice of pvc pipe that was then cut and adjusted to make a perfectly round run on the saw.  That takes some practice but is critical and it can be done if the time is taken.


Thursday, October 11, 2012

The Ad For My Book On Building Lapidary Equipment


Now with FREE SHIPPING WORLDWIDE !!! 

Save Big Dollars all the way around on this killer resource. $ 49.95 per book.


How To Build Diamond Trim Saws, Large Sized Diamond Drop Saws, Vibrating Tumblers, Giant Rock Saws For Cutting Decorative Tiles and Facings, Great Flat Laps, Bench Grinders, A Portable and Trouble Free water source for all Lapidary Operations, and much more.

This Self Published book is comprised of five plan sets which have consistently sold for 20 dollars each over the last three years or so, plus one plan set usually priced at 10 dollars, PLUS quite a few tricks and tips concerning other bench tools, methodology, and efficiency in the Lapidary Shop which have never been offered before.

These plan sets have been entirely redone with computer drawings and rewrites to the text which incorporate new information from R & D over the last 7 years. The book is over 45 pages of cut-and-dried and easy-to-understand How To Build Better Lapidary Equipment information, which will save the buyer THOUSANDS of dollars in equipment costs. I have many many happy customers who have purchased this information as individual plan sets, and do not even consider the cost of the plans themselves, because of the money they saved. Now, you can possess the entire inventory of plan sets as the book How To Build Better Lapidary Equipmentby Bill Gallagher, for a savings of over half, and with this information you can set up a full service lapidary shop for literally pennies on the dollar. With this information you can go into production, if you desire.

My diamond saw plans are the easiest, safest, and most effective plans for this type of equipment anywhere. The Vibrating Tumbler plans introduce a whole new way of achieving vibratory energy for abrasion, and unlike so many of the manufactured competitions machines, my design lasts and lasts and lasts. AND it is a lot simpler than anything out there. Over 3 years of long-hours and self-financed R & D went into that design, and it is a better way. The Flat Laps and Bench Grinders are two good chapters with three or four different designs for the grinders, some mine, some gotten from seeing old timers machines. The Giant Rock Saw is a machine I had only heard about 15 years ago, but I built one about 4 years ago, and it worx. These plans tell how to make the Giant Rock Saw, as well as my improvements made to the basic idea. The only thing not in the book is a facetor plan set, and that is because you would need a machine shop to build a facetor, whereas all the machines included here can be built from salvaged parts and lumber easily, safely, and with very little hassle, and they WORK well for a LONG time! Here is the Table of Contents:

I. How To Build A 6" 8" or 10" Diamond Saw

II. How To Build A Better Vibrating Tumbler

III. How To Build A Flat Laps for Grinding Sanding Polishing

IV. How To Build Bench Grinders From Old Car Parts

V. How To Build A Giant Rock Saw

VI. Trouble Free and Portable Water Source For ALL Lapidary

VII. Abrasion Theory and Application

VIII. Lapidary Shop Tips, Mounting Motors, Motor Attachments, Stone Holders and Jewelers Vise You Can Make Easily, Obtaining Free Abrasives, MORE.

IX. NEW! Build a nice large sized slabbing diamond blade drop saw. Excellent and easy design. Perfect for many things, including splitting geodes, preforming spheres, slabbing larger sized materials. Save big dollars by building this awesome saw.

X. Bill Gallaghers American Jamb Peg Faceting Configuration.  A better way.

This is a book of plan sets which usually sell for 20.00 each.  Special attention has been paid throughout the book to highlight sourcing of materials by salvage, and modification of the plans to match the particular materials at hand. Building these machines is not hard to do, and do right, for anyone with good mechanical and electrical aptitude. Once you have built a machine you never need worry about breakdown again, because you will know it inside and out, and repair is a breeze. 

Please see my other auctions for more.  Write with questions. FREE SHIPPING WORLDWIDE.


My Art Training

I have traveled for the last 15 years, seeking out teachers in areas I needed help with, concerning my art, my sculptures.  Right now I am serving somewhat of a wood apprenticeship with Terry McEniry of Seffner FL, learning about exotic woods and their workings.  It is the end of the teachings, and I am grateful to all involved.  I have studied with Daniel Lopacki (7 years), Ed Sankovich (2 years), Clarence Taylor (1 Year) and I avail myself of Tim McCreights work a LOT, which makes up the training in the media I require to create sculptural art.

Leather metal stone and wood.

There is strength in diversity and flexibility too.  I like to mix the media above.

I began casting metals as a way to make leather hardware, later I met Ed and read Tim, and those two helped me with my metal work big time.  Stone I have always been into, and Danny Lopacki sponsored my work with guidance, money, and tooling for 7 years out in NM.  Leather I learned in jr. high school under the tutelage of Clarence Taylor, and

Using Wood To Build Lapidary Machines

Terry at Gunn Cues here in Tampa (tampabilliards.com) and I were talking one day about construction of machinery.  He is adept, and a long time user and constructor of many machines, mostly woodworking, because he is a world class cue maker.  He advised me to start using wood to construct the frames and boxes for my lapidary machines;  it would be a lot easier, less expensive, and it would vibrate a lot less.  I had almost always seen lapidary machines in metal, totally metal, angle iron, sheet, bar, all welded and watertight.  This idea of wood flew in the face of my experience, but it was a great suggestion, and one that will be incorporated into the next edition of the book.  There is some leakage, and that can be overcome with fibreglass, but overall, I operate outside most of the time anyway, so the leaks were not a problem, as I drained the machines after use anyway.

I was able to construct things a lot more easily from wood, and yes, much of the vibration was nixed.  Very nice.


Introduction To This Blog

This blog is based on my book of the same name, which has been selling rather steadily now for over 5 years.  I sell the book on my own sites, on ebay, and on Bobs Rock Shop Classifieds.  The book is a compilation of many plansets that I have developed over a long period of time, and sold individually until assembled in this book.  Most are my inventions, or things I have seen and rebuilt, improved.  Several are gifts from some very gracious people, and those are appropriately labeled, and thanks again you guys.  I also took the opportunity, while making the book, to polish things up a little, heh heh, and to add some chapters as well.  Nearly all buyers have been happy with the information, and if they build one of the machines it will save them several times the cover price.  Anyone can build these machines and the bigger or more they build, the more money they will save and make.  This blog is being written as a place for buyers of my book to connect with me about questions or suggestions.  There will be pertinent discussion and writing on up-to-the-moment developments and new discoveries.  Thanks for reading, and good luck always.